Saturday, June 7, 2008
Tutorial Eight: Assistive technology
A definition of assistive technology
"Any item, piece of equipment or product system whether acquired commercially off the shelf, modified or customized that is used to increase or improve functional capabilities of individuals with disabilities.
One assistive device that I looked at...
Fiber optic eye blink switch
Size: Small padded clip with small sensor box attached.
Cost: A lot. $1068 including the power box.
Functions: Works best when a eye blink is all the client can do. The sensor can be set to sensitivities to activate with a purposeful blink compared to a normal blink. It is used to control switches.
How does the blink switch increase functional capacities?
The blink switch gives the user options and a form of independence that otherwise might not have had. It facilitates the operation of radios, blenders, TV, any device that you can plug power into.
Retrieved 7th June, 2008, from http://www.spectronics.co.nz
Tutorial Seven: Posting You Tube videos and Flickr badges to blogs - explaining the process
~ I am going to try and make this sound as uncomplicated as possible :) ~
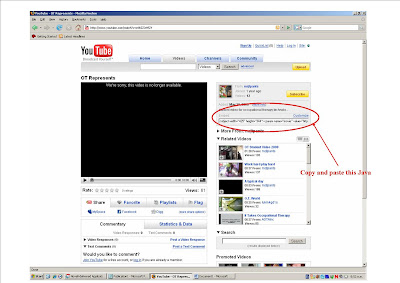
Step by step process to embed You Tube videos into your Blog
1. Go to http://www.youtube.com
2. Search for the video you want to post on your blog.
3. Click on your video to bring it on the page.
4. On the right hand side there is a sentence of Java script under "Embed."
5. Select all of the script.

6. Paste Java script into a new post.
7. Give your video a title.
Step by step process required to embed a www.Flickr.com badge into your Blog
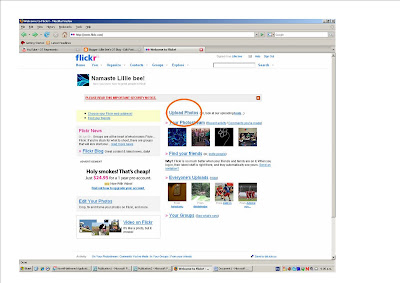
1. You need a yahoo.com ID to log onto www.flickr.com
2. Sign in.
3. Browse and upload photos from your computer following the guide.

4. Edit your photos details and add a description - to make a photo badge, your photo has to be set to "public"
1. You need a yahoo.com ID to log onto www.flickr.com
2. Sign in.
3. Browse and upload photos from your computer following the guide.

4. Edit your photos details and add a description - to make a photo badge, your photo has to be set to "public"
5. Once you've uploaded your photos, preselect the ones you want for your badge by making them"public." If you don't want them on your badge, make them "private."
6.Now, at the very bottom of the page there are several options you can do. In the "help" row, selected "tools."
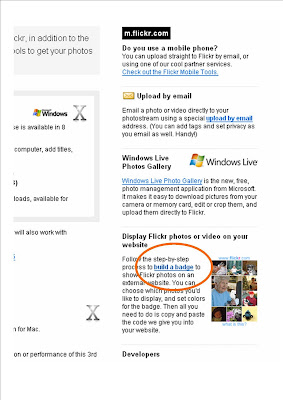
7. Then on the right hand side, select "build a badge."

8. Follow the guide to make a badge.
9. At the end of the guideit prompts you to copy and paste the "code."
10. Back to your blog, go to your blog "layout."
11. Click on "add page element."
12. Select "HTML/JavaScript.
13. Paste code and give you badge a title.
14. "Save."
15. Check out your lovely new photo badge on your blog.
6.Now, at the very bottom of the page there are several options you can do. In the "help" row, selected "tools."
7. Then on the right hand side, select "build a badge."

8. Follow the guide to make a badge.
9. At the end of the guideit prompts you to copy and paste the "code."
10. Back to your blog, go to your blog "layout."
11. Click on "add page element."
12. Select "HTML/JavaScript.
13. Paste code and give you badge a title.
14. "Save."
15. Check out your lovely new photo badge on your blog.
Tutorial Four and Five: Video production sessions
Plan a storyboard
Check
Set up a U Tube account
Check
Post video on U Tube
Check
You Tube and what it offers
Check
Set up a U Tube account
Check
Post video on U Tube
Check
You Tube and what it offers
You Tube is a website that allows people to upload and share original videos worldwide. Anyone with internet can watch You Tube providing they have the internet. You can watch current event, people's documenting their lives in a video blog, hobbies, skits, music videos, anything you could want to watch and most likely you'll find it.
The use of planning a storboardStoryboards are a series of illustrations displayed in sequence for the purpose of previsualizing an animated or live-action film. A storyboard is essentially a large comic of the film or some section of the film produced beforehand to help the directors and cinematographers visualize the scenes and find potential problems before they occur.
Subscribe to:
Comments (Atom)


